Creating routes
We have just created a new custom entity to define a user inside our system. Now, we want to create a route to handle it.
Create a new route
Creating a new route is fairly easy, the CLI will do that for us. Open your terminal and type:
gazelle create route
The CLI will ask for a route name, let's type in users.
✨ What would you like to name your new route? 🚀
users

💡 users route created 🚀
If we open up the backend/server/lib/routes directory, we should see our
newly created users route with a simple get handler identical
to the hello_gazelle route.
Updating the handler
First things first, let's create a list of users to add some "persistence" to
our backend. Create a file under the backend/server/lib directory called
users_collection.dart with the following content:
import 'package:models/models.dart';
List<User> usersCollection = [
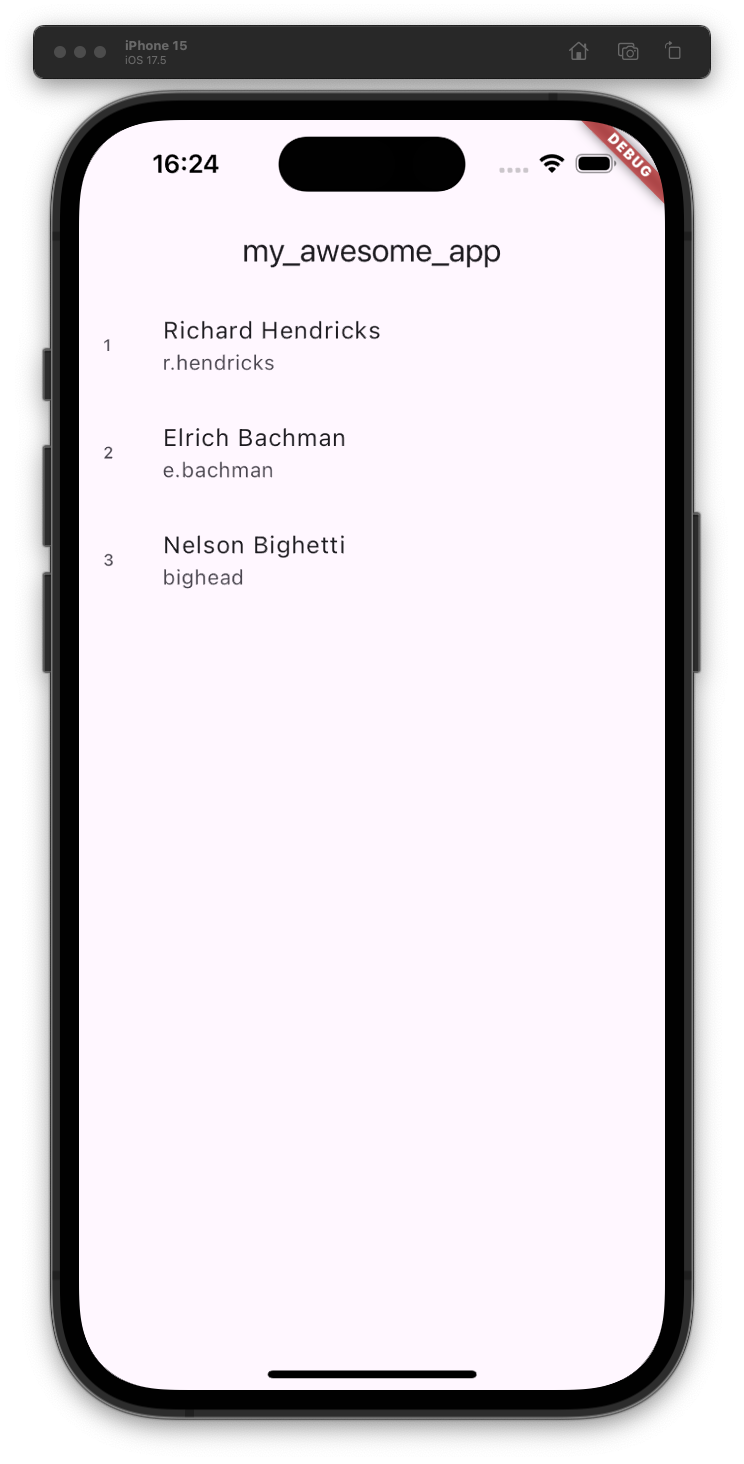
User(id: "1", name: "Richard Hendricks", username: "r.hendricks"),
User(id: "2", name: "Elrich Bachman", username: "e.bachman"),
User(id: "3", name: "Nelson Bighetti", username: "bighead"),
];
Now we want to update our handler to return a list of users to the client. Let's do that by replacing the default code to something like this:
import 'package:gazelle_core/gazelle_core.dart';
import 'package:models/models.dart';
import 'package:server/users_collection.dart';

GazelleResponse<List<User>> usersGet(
  GazelleContext context,
  GazelleRequest request,
) {
  return GazelleResponse(
    statusCode: GazelleHttpStatusCode.success.ok_200,
    body: users,
  );
}
As you can see, we have changed the body type of the response from String to
List<User>, and updated the call method body to fetch some users and return
them to the client.
Adding the route to the server
To add a route to the root of your server, open your server.dart file and
add users to the routes parameter of your Gazelle application:
Future<void> runApp(List<String> args) async {
  final app = GazelleApp(
    routes: [
      helloGazelle,
      users,
    ],
    port: 3000,
    modelProvider: BackendModelProvider(),
  );

  await app.start(args: args);
}
Routes can also be nested, to do that, just add a route to the children parameter of another route, but for the sake of this guide, we're going to keep it simple.
Update the client
We now need to update our client with the new API, so let's type
gazelle codegen client
inside our terminal. The CLI should say that the client has been generated successfully.
✅ Client generated 🚀
Import the client in your Dart frontend application!
Update the Flutter app
Now, we only need to update our UI to show our users in a list view.
Copy-paste the following code in your main.dart file:
import 'package:flutter/material.dart';
import 'package:client/client.dart';

void main() {
  gazelle.init();

  runApp(const MyApp());
}

class MyApp extends StatelessWidget {
  const MyApp({super.key});

  @override
  Widget build(BuildContext context) {
    return MaterialApp(
      home: Scaffold(
        appBar: AppBar(
          title: const Text('my_awesome_app'),
        ),
        body: Center(
          child: FutureBuilder(
            future: gazelle.client.api.users.get(),
            builder: (_, snapshot) => switch (snapshot) {
              AsyncSnapshot(:final data?) => UsersList(users: data),
              AsyncSnapshot(:final error?) =>
                Text('${error.runtimeType}: $error'),
              _ => const CircularProgressIndicator(),
            },
          ),
        ),
      ),
    );
  }
}

class UsersList extends StatelessWidget {
  const UsersList({
    required this.users,
    super.key,
  });

  final List<User> users;

  @override
  Widget build(BuildContext context) {
    return ListView.builder(
      itemCount: users.length,
      itemBuilder: (context, index) {
        final user = users[index];
        return ListTile(
          title: Text(user.name),
          subtitle: Text(user.username),
          leading: Text(user.id),
        );
      },
    );
  }
}
Start your app again like we did in this part of the tutorial. And that's it! You have just created a new API and used it into your Flutter application. The result should look something like this